How to convert JPG to SVG on Mac
To convert JPG to SVG on Mac, open the JPEG in Curvata, review the automatic trace in Compare, and export the SVG. For a logo or drawing, pay particular attention to compression noise around edges and small text.
This guide uses Curvata, a free image vectorizer for Mac. Your images are traced locally, with no account or cloud upload.

Start with the least compressed source
JPG and JPEG are names for the same common raster format. JPEG does not support an alpha transparency channel, so its background is part of the pixel image. Compression can add ringing, blocks, and slightly different colors near sharp boundaries. Those small changes are especially noticeable around lettering and flat logos.
Use the largest, cleanest source you can obtain. Repeatedly saving a JPEG can add damage. Converting that damaged file to PNG avoids further JPEG compression, but it does not remove artifacts already present in the pixels.
If both a clean PNG and a compressed JPG of the same logo are available, start with the PNG. If the JPG is the only source, inspect it before tracing and identify which details really belong to the artwork. See source preparation for contrast and resolution choices.
Convert a JPG in Curvata
- Open the JPG or JPEG. Click Open image, use ⌘O, or drag it into Curvata.
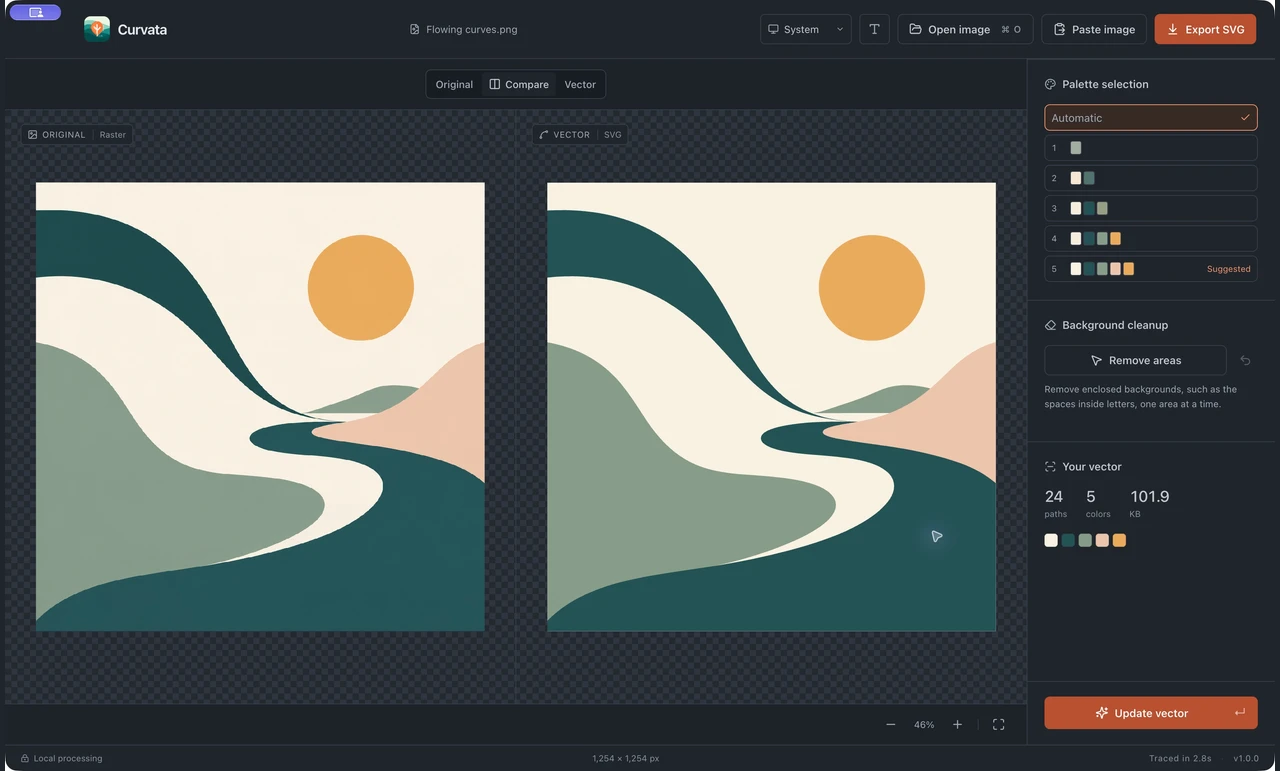
- Wait for the automatic trace. Keep Automatic as the first result rather than reducing colors immediately.
- Compare edges. Select Compare and zoom into letter corners, narrow gaps, and curved boundaries.
- Evaluate a simpler palette. For a flat logo, a preset may reduce unnecessary colors. Click Update vector and compare again.
- Remove unwanted background regions. Use Remove areas deliberately. Preserve highlights and inner fills that are part of the design.
- Export SVG. Save a separate vector file and inspect it in the app where you will use it.
Curvata traces one image at a time. The source stays a JPEG; the export is a new SVG containing paths.
Recognize compression artifacts
Look for a faint outline that was not part of the design, a patchwork around text, or tiny islands beside an otherwise clean edge. A tracer must decide whether those colors are artwork or compression residue. Automatic processing helps, but there is no single setting that can perfectly resolve every degraded source.
Compare the result at the intended display size as well as at high zoom. A tiny imperfection may disappear in a small icon while a lost counter in a letter stays obvious. Prioritize recognizable structure over a particular path count.
A reduced palette can simplify unwanted shades, but it can also discard subtle intentional colors. Compare it with Automatic and read the palette guide before choosing the smaller set.
Decide whether a photograph needs SVG
Curvata accepts photographs, but logos and drawings are the primary use case. A photograph contains texture, lighting, and many small color changes. Tracing those changes may produce a stylized result or a large number of regions rather than a compact, easily editable illustration.
For a website photo or an ordinary photo print, keeping a raster format is often appropriate. If you want an illustrative effect or editable color regions, inspect a trial vector carefully. Do not assume that SVG makes a photograph sharper or restores missing focus.
For a cleaner logo result, use the logo vectorization guide. For a scanned ink drawing, follow the drawing workflow, where paper texture and stroke thickness need different attention.
Common questions
Will converting JPG to SVG remove the white background?
Not automatically in the current workflow. A solid JPEG background can become a vector region. Review it and use background area removal if you want it gone.
Does SVG restore lost JPEG detail?
No. It estimates boundaries from the available pixels. A better source usually helps more than enlarging a damaged JPEG.
Can I open a JPEG that is over 40 MB?
The current file-size limit is 40 MB, with a 64-megapixel decode limit. Export a smaller supported source in another app, while keeping enough detail for the trace.
Explore all Curvata guides or visit Curvata for Mac to learn more about the app.